

THE MELO FAMILY
2025
A family of lights designed to move with you through life. With a new generation in mind, we set out to make designer lighting both accessible and renter-friendly. Each piece is flat-packable, able to fold and travel as easily as clothing while the shade is crafted from 100% organic seeded cotton canvas to bring natural, lasting materials into daily routines.
Inspired by the heritage sewing technique of smocking, it’s reinterpreted in a modern context to embody durability and softness. Drawing from Japanese and Scandinavian design principles, the collection highlights material honesty: the natural coloration of the seeded canvas emits a warm honey glow, creating atmosphere while avoiding the harshness of traditional lighting.
Melo, derived from the Latin word mel for honey, references both the honeycomb smocking texture and the gentle radiance that fills a room. Designed to be disassemblable, durable, and enduring, the fixtures reflect our study in applying a mono-material to a variety of product lines, reducing waste and encouraging longevity. Melo aspires to continue the mid-century goal of democratic design, creating objects that are timeless, portable, and accessible yet imbued with meaning and craft. This collection marks the beginning of our journey to bring sustainable, designer-quality objects into everyday life.
(click icon to jump to section)


HOW IT BEGAN


To validate my 3D printed lamp design for the studio WOOJ, I wanted to see if I could make it out of an alternative natural material.
I began experimenting with canvas and leather to see if I could create the desired effect. I quickly learned to diffuse the light, the holes would have to be sewn shut. This lead me to develop my own unique pattern in which a smocking technique was adapted.
By creating circles and sewing them together in an accordian, the outside edges could be sewn together to create a "Honey Comb" pattern.
This technique that was later developed to create the shades...
The prototyping process began by creating a wide variety of shapes and sizes. Using both Rhino 3D and physical sewing, I was able to test out a large variety of forms. A method to the madness had to be identified...
What shape and size makes sense? From chaos comes order.
By looking at the manufacturing technique that would be used to cut the pattern pieces, the final piece of the puzzle clicked.

Each pattern piece is made from a circle. To maximize material yield without having to discard the center circles, I designed three size shades that nest inside each other. The family was the created.
Each is CNC cut to make three complete sets of sizes using 1.5yrds of canvas.
Understanding the width of my fabric, the sizes were determined based on the most efficient nesting with least amount of byproduct waste.

SMOCKING
Transitioned from a single hand knotted stitch to a straight stitch on a machine to help give form to the shade while decreasing production time. This new smocking technique created a smoother curve instead of a sharp and rigid form. The length of the straight stitch can be adapted among sizes.


Each size variant gets a different length and number of tack points (edge stitches) to achieve the same unified look at the end. This allows for every cell across the family to come out to the same size.
PIPING
Before finalizing the design, I experimented with piping the edges to see how this would effect the form of the shade when expanded and give a "finished" look. I decided against it due to increased manufacturing time and excess construction pairing back an already visually complex design.


MELO PENDANT LIGHT
The largest of the family, the Melo Pendant Light is a flat packable renter friendly solution to warm your space with a honey glow. Designed with durability and ease of assembly, the pendant includes an 18' cord and dimmer to adjust to your space wherever you move throughout your life.
THE HANGER
The innovation resides in what I call "The Hanger". How do you get a structure large enough to support the shades form, into a hole half as big? Inspired by a clothing hanger designed by MUJI. A notch allows the hanger to slip into each arm hole of a shirt without stretching out the collar. Insetting the connection point allows for the shade to lay visually flush and seamless with the system at eye level.

PROTOTYPES

3D printed prototypes understanding how it can connect both to the shade and wire. Some variations clipped on or screwed into the socket.


Then transitioned into 10 gauge bent steel wire prototypes fastened to a metal washer.
ASSEMBLY
The whole assembly is comprised of seven pieces. A paired back lamp allowing for the shade to be the focal point of the design. Fully disassemblable to allow for a smooth installation.

SVT-B WIRE
THE HANGER
1" 1/8IPS PIPE
STRAIN RELIEF
SOCKET COVER

MELO TABLE LIGHT
The shade is cut from the excess fabric of the Melo Pendant Light conserving fabric waste. Designed to be fully disassembled and flat packed. The most complex construction of all the lights, it features wooden legs made from rubber wood, a byproduct of the rubber industry. Inspired by Japanese table lights and Scandinavian design, it brings a warm glow diffused from the natural cotton canvas.

LEGS
HANGER
HARP
SOCKET
HANGER

IDEATION
Two problems needed to be solved for. How to assemble the light while keeping the shade expanded and the form of legs. Using the same hanger design as the Pendant Light, these component can be interchanged to allow the medium shade to become a pendant. Two hangers are used for the assembly to allow the shade fully taught and doubles as creating a cage for the lightbulb in case of falls.
Beginning with wire forms and four legs to create a simple repeatable form to manufacture that could be slid on and secured. I identified five typologies.

ARCH
CLIP
NOGUCHI
WIDE
SHORT


Then transitioned to a mixed variety of wooden legs with bent steel wire to create a unique and warm sensation. Using wood as a base comes from a personal inspiration in Danish Mid-Century Design


PROTOTYPING
Using 3D printing, I created a variety of legs to test the silhouette and balance of the design. I focused on seeing how thickness, length, and angle of the legs would affect the overall form.


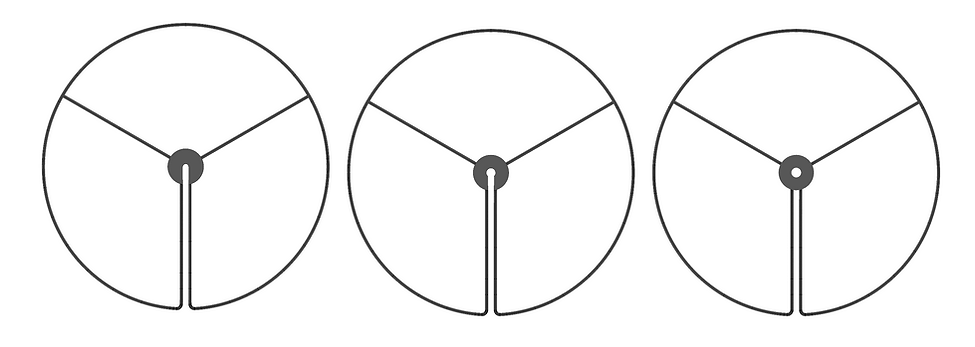
Three legs tack welded to a washer on top, middle, and bottom, when put together line up to sit on the table level.
Made of a rubber hard wood, it's a byproduct waste of the industry when a rubber tree stops yielding. This makes it a sustainably harvested material.


The legs are able to be flipped and rearranged to be hid and stored inside the shade to allow for a modular display of the Table Light.

MELO DESK LIGHT
The baby of the family. This little guy is cut from the remaining cotton canvas of the previous two shades. They give off just enough to light a bedside or accent a shelf. It’s compact size allows for a range of environments and its flat-packable design makes it perfect for moving. The internal frame keeps it safe from harm giving it form while creating a cage for the bulb inside.
IDEATION
The main problem that was solved for was creating a internal structure as paired back as possible, small enough to fit inside, while simple enough to assemble without thought. I variety of mechanisms were developed in order to give expansion to the shade without seeing the silhouette from the top. I wanted the frame to pair visually and live within the same typology as the others utilizing steel 10 gauge wire.


PROTOTYPING
Using both wire bending and 3D printing, I was able to identify an array of concepts and functions based on minimal amounts of parts and ease of assembly/manufacturing.


Finalized on two components, a top and bottom set of legs, that screw onto the socket. The form acts as a live hinge allowing the structure to slide in and expand to the form.


